These cute and comfy bootie slippers are so easy to make out of small amounts of worsted weight yarn. They join with single crochet so there is no sewing. There is no separate sole piece to make or try to make fit on like other hexagon bootie patterns. Want ankle boots? Add 2 more hexagons on the top. These are a perfect seasonal gift and seniors love them. If you use the RedHeart Super Saver Yarn they are machine wash and dry and will last quite a long time. I like it when they get washed enough so they become felted.

4 hexagons for each bootie made from worsted yarn
Download your FREE pattern here –> HEX SLIPPERS
Materials – Red Heart Super Saver yarn. You can use as few or as many colors as you want. If you use only 1 color it takes 1 super saver skein (7 oz). Pattern tells you were to join yarn for color changes but I’ll leave which colors up to you.
Small size – F hook (very small women’s size)
Medium size – G hook (fits women’s small to medium size)
Large size – H hook (fits women’s large / men’s small)
Extra large size – I hook (fits women’s x-large / men’s medium)
For men’s large you can use 2 strands held together and K hook (hint from another crocheter so it’s not tested)
Note: use firm tension throughout or your slippers will be flimsy and stretch out
Hexagon motif (make eight)
Create a magic circle… or chain four and slip stitch to create a circle, whichever you prefer.
Round one (Center): chain four (counts as first treble crochet), 17 treble crochet into circle, join at top of chain four. Finish off. (18 treble crochet)
Round two (clusters): join yarn into any top of a treble crochet from previous round, slip stitch three (counts as first part of cluster stitch),* yarn over hook, insert into same treble crochet, yarn over hook pull up a loop to match the height of the previous chain three*, keeping all loops on hook repeat from between the asterisks, holding all loops on hook yarn over and pull through all the loops. Chain one. Cluster stitch made. The next petal cluster stitch will not have the first chain three. Using same cluster stitch method, *yarn over hook, pull up a loop* repeat three more times between asterisks, yarn over hook, pull through all loops on hook, so that this makes another cluster in the next treble crochet. Chain one. Continue in this manner around the circle making a cluster stitch in the top of each treble crochet on round one with one chain stitch between them until you have made a total of 18 clusters in every treble around the circle with one chain stitch between each of them. Join with a slip stitch to the top of the first cluster. Finish off.
Round three: join yarn into any space between clusters from previous round. Chain 3 (counts as first part of cluster), insert hook into space of previous round where you joined, yarn over hook pull up a loop, yarn over hook pull through two loops on your hook but keeping two loops on your hook unworked, insert hook into same space between clusters, yarn over hook pull up a loop, yarn over hook pull through two loops on your hook keeping now 3 loops on your hook unworked, yarn over hook pull through all three loops (first cluster made). Chain 2. Your next cluster will be made in the space between the next two petal clusters on the previous round. Making a cluster as you did before but omit the chain 3,* insert hook into space, yarn over hook pull up a loop, yarn over hook pull through two loops, leaving a loop left unworked on your hook*, repeat two more times (total of 3 times for each cluster) from between the asterisks, you should now have four loops on your hook, yarn over, pull through all four loops, and then ch 2. (cluster plus chain 2 made) Continue making clusters between the clusters on the previous round below in all 18 spaces around the motif. Chain two between each cluster. After last cluster is made, chain two, and attach with a slip stitch to the top of the first cluster you made on that round. Finish off.
Round four: attach yarn in any space between previous round of clusters, chain three, four double crochet in the same space you just joined in,* three double crochet in the next space between the next clusters on previous round, and again, three double crochet in next space between clusters on previous round, then five double crochets in next space between clusters*. Repeat between asterisks. Continue pattern of five- three- three, double crochets in each space between leaves until all 18 spaces are filled and join with slip stitch to first double crochet. Finish off. You will notice this has created your hexagon shape.
Joining– this is the tricky part but its easy if you just follow the diagrams below. Holding two hexagons with wrong sides together, you will work a series of single crochets through both pieces at the same time. This not only sews your pieces together to make the slipper, but it gives a nice edging to your entire piece. Line up your stitches so that sections of five double crochets match up on both pieces… so the hexagons are identical over the top of one another. Join yarn in the middle double crochet of a set of five which would be the middle of a hexagon point. Remember to work through both hexagons throughout the joining unless otherwise instructed. Two single crochet in the same stitch that you joined (counts as 3 sc in middle dc of set of 5 on previous round). Continue working through both hexagons, work 10 single crochets across to the next point of hexagons, then work two single crochets in the next double crochet. Unfold the two hexagons while keeping your work intact. Pick up a another hexagon, aligning it wrong sides together along the next edge (see diagram below), line up your stitches the same way you did before, two single crochets through both hexagons in the next double crochet, work 10 single crochets across edge to the next corner, then work 3 single crochets in the next double crochet which should be the middle double crochet of a set of five double crochets which is the corner. DO NOT FINISH OFF. Your piece should look like this: (where the red lines are the row of single crochet that joins both ankle hexagons to the toe hexagon.

Diagram 1
You will continue this row around the toe section now. Keeping your stitches intact, align your 4th hexagon to make the sole at the front of the foot. Don’t worry, you will stitch the heel of the sole later. We are just going to attach and edge around the toe & sole hexagons now. Holding WRONG SIDES TOGETHER with your connected piece (as shown above) on TOP, align your 4th hexagon under the toe so it matches. Make sure your right side of the sole hexagon is facing downward so that you’ve got your wrong sides together toward the inside of your shoe. 
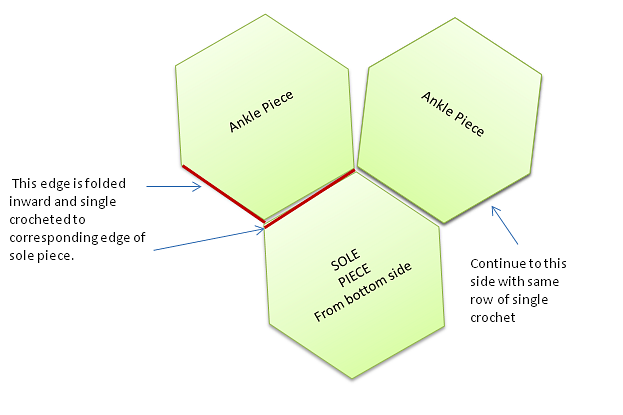
Diagram 3
Now you have to flip the whole shoe over to work on the sole side. You will make a continuous seam of single crochet edging just like you did for the top part, however this one will make an inverted V underneath the foot on the sole.

Diagram 4
Finally, you will attach red yarn at the mid-point of the V under the sole and work through both pieces of the ankle/side hexagons in order to join the heel seam all the way to the back of the ankle (shown by arrow on photo below)… THEN… without finishing off… simply turn your work upright and…
Continue working in single crochet around the foot opening of the slipper to make a nice edge all the way around the top of your slipper. In this photo I have used a reverse single crochet, also called a backward single crochet… however just using a nice firm single crochet around will suffice to create a finishing border on the shoe. If you want the ridged look of the backward crochet stitch you can Google it online and there are tutorials on YouTube galore on how to do it.

Note: you can add 2 more hexagons to the ankle area to make ankle booties. Guys tend to like the boots better & the tops can be folded down for even more variation on the boot look.
Feel free to make & sell the slipper booties from this pattern but do not reproduce this pattern, publish or distribute it in any way.
© ChelseaCraft 2014
Originally intended for publication on Ravelry.com for Christmas 2013
All rights reserved.

I absolutely love, love, love this pattern!! No more pulling my hair out over slippers that bunch up at the ankles or puff outwards at the arch of the foot. Good riddance to skinny little soles that are never wide enough.
Chelsea, thank you for sharing your talent and making this pattern available at no cost.
Cheers, Irene
You’re welcome Irene! Those were my problems with the original hexagon slippers but they looked so cute in the photos I just had to make them. When I finally cracked the code on these for myself & family members I didn’t like the thought of others fighting with the soles like I did. Happy Thanksgiving & holiday season!
Chelsea, I am crocheting these hex slippers and have decided to make a bootie, now I am stuck how to attach the two extra hexagons to the ankle pieces, please assist.
You can hold them wrong sides together (the slipper & the new hex – may be easiest to turn slipper inside out) then single crochet the first two edges, grab your next hex holding it wrong sides together with the slipper & continue around the two edges till you are back where you started. Bind off there. Now join at the base of one of the slits that is left to sew up, holding wrong sides together single crochet that edge then continue going around the top of the boot until you come to where the last open slit side is, hold the slit together and single crochet that edge then bind off. Attach your yarn on the top edge of the boot that needs to have the finishing edge completed and single crochet around the 2 edges until you’ve met where you started. Bind off. Weave in your yarn ends using a tapestry needle. That should fix you up with a bootie now! 😀