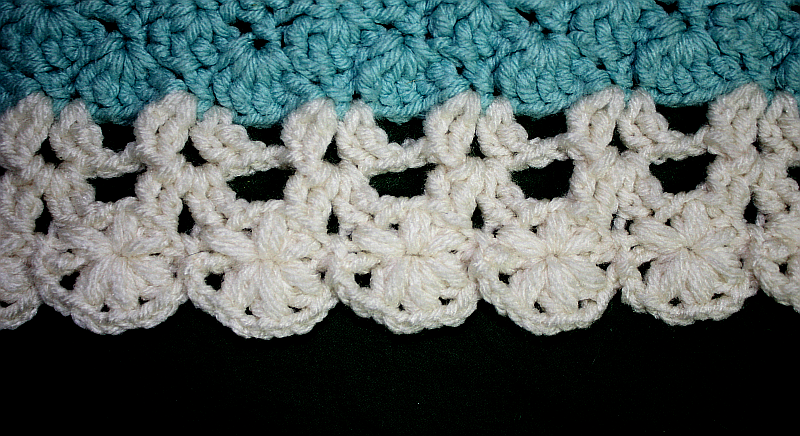
 This edging was created for a sentimental old afghan I made about 20 yrs ago from worsted yarn that needed some sprucing up. This photo shows the edging in Red Heart Super Saver Aran color worsted yarn. However, this edging can utilize any thread, cord, yarn… whatever. The pattern and chart are written as a stand-alone edging that you sew onto a main piece you wish to edge. You can omit the chain stitch foundation if you are edging an afghan. At the end of this pattern I have included some instructions for working corners as I did for my afghan project.
My edging was made using an G hook for rows 1 to 3. The last 2 rows I used an F hook.
The chart shown is accurate for the stitches but you need to follow the written pattern for the flowers because the chart can’t explain how to make the puff flowers exactly.

Instructions:
Foundation Row 1 – ch the length you need in multiples of 3. Alternately, if you are edging a square piece, just make sure you have a single crochet row around your entire piece.
Row 2 – ch 5, dc in 4th ch, [ch2, skip 2 ch, dc in next ch] for length of your piece.
Row 3 and 4 – ch 5, *[2 dc, ch1, 2 dc] in dc, ch2*, repeat between asterisks ** to end of edging and dc in turning chain from previous row.
Row 5 – ch 5, sl st in ch 1 space of fan cluster, *ch3, working from front to back, [YO, insert hook into same ch space of fan cluster, YO, pull up a loop to the height of a dc stitch, YO, insert hook in same space, YO, pull up a loop to the same height, keep loops on hook, YO, insert hook under ch2 space between fan clusters, YO, pull up loop keeping height even with all loops on hook, YO, insert hook in same place, YO, pull up a loop in the same space, hold all loops on hook, YO, insert hook into ch 2 space of the next fan cluster, YO pull up a loop to same height as all other loops, YO, insert in same space, YO pull up loop, YO and pull through all loops on hook] (bottom half flower made), ch 3, sl st in same ch 1 space of the fan cluster below you just worked in*, repeat between asterisks ** for the length of edging.
Row 6 – ch 6, sl st in sl st in ch 1 space of fan cluster,*ch2, [YO, insert hook from front to back into the center of the petals of your previous flower cluster, YO, draw up a loop to the height of a dc, YO, insert hook again into the flower center, YO, draw up a loop to the same height, YO, pull through all 4 loops on hook tightly] (puff petal stitch made), ch 2, work another puff petal stitch into flower center, twice (3 petals worked completes the flower), ch 2, sl st in the sl st between the flowers*, repeat between asterisks ** for remainder of edging.

Suggestion for Afghan Corners
I used a filet pattern for my afghan corners. To do this I suggest you start with 1 row of sc around the whole afghan. At each corner, work sc, ch2, sc in the same corner point or stitch. (counts as row 1… or round 1) Work your edging pattern and at the corners use this:
Round 2 – at each corner end edging with ch 2, work 3 dc, ch3, 3 dc in each corner ch2, then ch 2, and continue edging pattern above.
Round 3 through 6 – at each corner end with ch 2, dc in the dc of the current fan group or the sl st of half flower group, ch 2, dc in the next dc, and [ch 2, dc] over any remaining space to corner group, work [4 dc, ch3, 4 dc] in the corner, then work [ch2, dc] over to the start of your edging pattern, end with a ch2 to pick up your edging pattern again. (see photo)
Remember that with every successive round the filet mesh increases by one mesh square (ch 2, dc) on each side of the corner.
All Rights Reserved by ChelseaCraft© 2014
You may not reproduce, distribute or sell this pattern in any way. You may sell anything you make from this pattern.
Ravelry Store: http://www.ravelry.com/stores/chelsea-craft-designs
